Getting Hyper-V to work

water_02


Yesterday I was setting up Hyper-V on my new Windows 8 laptop I’ve got from work.

On my own laptop it all worked perfectly and I wanted to have an exact same config. So that’s what I’ve done. Only somehow I just not got it to work. Both laptops had the same configuration settings all identical but one worked and the other one not.

After a lot of auch and oofffs, and removing and creating new virtual switches in the Hyper-V Manager I founding the solution.

Just by disabling the Hyper-V adapter and enabling it everything started to work magically and running very smooth. I don’t have a clue why I had to do this for the first time ever but the disable/enable trick fixed the problem.


How to find all the owners of your SQL databases

Sometimes when you go true your list of databases in SQL Studio Manager you notice the owner of the database is somebody who left the company for quite some time. This can happen because the database was create while that person was logged in at that time and he automatically became the owner.

A lot of times accounts are put to disabled in the Active Directory and a scheduled to be deleted an X period later. That’s the moment that problems can arise.

It’s better to make sure your databases are owned by a service account or something like SQLadmin or SA (SQL System Admin). The query below gives you a list of all your database names with the owners so you know which once to change.


The Query

select suser_sname(owner_sid),name
from sys.databases


Tip to modify your query

If you like to see more columns for what reason so ever. Type , * in the query and you get all the columns including the header names. Now you know what the column is called and you can use that name instead of the * star. Now your query is expanded with the extra column.


How to Change?

Right click your database go to properties and under Files in the left column you get the option to modify the database owner in the right part of the screen.


How to make a AdminContent and SharePoint_Config database without a GUID


There are only a few ways to make SharePoint databases, Automatic or Manual. If you choose the automatic way you get ugly GUID’s behind your databases and if the wizard did all the handy work for you  everything is configured under one Service Account. A true passionate admin go’s for the manual path and want as less GUID’s as possible.

Some Service Applications give you the option to specify the database name but unfortunately not all. I suggest to look in to PowerShell and find the scripts to create also those ones by one completely the way you like them to be.

For the first two databases of your farm you need to do a little trick to get rid of the GUID.

The AdminContent database is like the name says the Content Database for the SharePoint Configuration Console. The other one is the SharePoint_Config database which holds the little configuration settings of your farm.

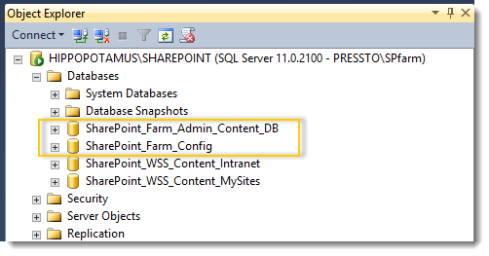
I suggest to make your own naming convention to keep everything clear. I always rename the SharePoint_Config to SharePoint_Farm_Config and the AdminContent to SharePoint_AdminContent so both stay nicely together in alphabetical order in SQL.


Here how to make the GUIDless

After you run the installation and you get the question to run the Product and Configuration wizard it’s very important to uncheck the little checkbox and stop the installation.

Make sure your logged on as DOMAIN\SPsetup and SPsetup had dbcreate and securityadmin server roles authorizations in SQL.


Check if your User Access Control Level is disabled in the Control Panel under the users section and run the command prompt as an Administrator Run >> cmd -admin


Go to this path, C:\Program Files\Common Files\microsoft shared\Web Server Extentions\15\BIN
Change the number to your SharePoint version, 12 = MOSS 2007, 14 = SharePoint 2010 and 15 = SharePoint 2013


Run the following code from your DOS Prompt with elevated admin privileges!!

psconfig -cmd configdb -create -server <SQLServerName> -database <ConfigDatabaseName> -user <DOMAIN\farmaccount> -password <FarmAccountPassword> -passphrase <PassPhrase> -admincontentdatabase <AdminContentDatabaseName>


Example

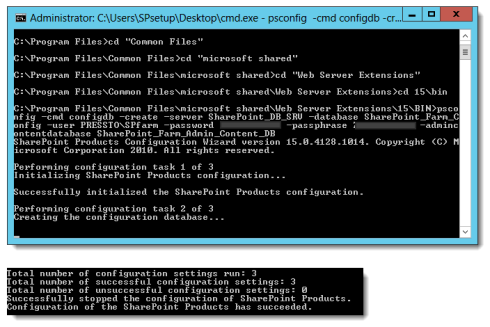
psconfig -cmd configdb -create -server SharePoint_DB_SRV -database SharePoint_Farm_Config -user DOMAIN\SPfarm -password ******* -passphrase ******* -admincontentdatabase SharePoint_Farm_Admin_Content_DB

Now you see the PSConfig.exe do some stuff and you have two fresh databases. check SQL Studio Manager. If you have any problems I guess you have not set your permissions correct for the two accounts or the command prompt is not ran as an administrator.
Good luck


Usage and Health Data Collection Service Proxy Stopped

Sometimes you notice that under the Service Applications which are provisioned one of them is stopped. If that’s the case you have to restart them via PowerShell. The Usage and Health Data collection Service Proxy is stopped almost certain after provisioning and sometimes just to be spontaneous. It’s an unfortunate known bug.

 The PowerShell Script below will help you restart the Service Application.  

  1. Open PowerShell and Add the SharePoint Snapin.
    Add-PSSnapin-Microsoft.SharePoint.Powershell
  2. Get-ServiceApplicationProxy
    This will give you a whole list of Service Applications.
    Get-SPServiceApplicationProxy | where {$_.TypeName -like “Usage*”}
    This will only give you the Usage Data Collection Service Proxy because your filtering on one starting with the word “Usage*”
  3. Double click on the ID number and copy it to an empty notepad file.
  4. Copy the script below and replace the part with the ID you just copied.
    $UP = Get-SPServiceApplicationProxy | Where {$_.ID -eq “Paste ID Here”}
    $UP.Provision()

Now if you refresh the page with your published Service Applications in Central Admin the SA is Started.


SharePoint 2013 training for IT pros

When the beta of SharePoint 2013 I was really excited and now after a short while of playing around with it I really really get excited. These new features are awesome and the product team did a brilliant job creating them.

I discover so many new features and new thing that I highly advice anyone who’s interested to get up to speed as quick as possible. SharePoint is a long way far from the clicker the click. It’s easy to set things up and to use for end-users but to make everything work right and design correctly it’s complex.

Nothing the less that makes it exciting and cool especially if you poses the skills 🙂

I come across this link with a lot of good PowerPoint presentations from Microsoft.

http://technet.microsoft.com/en-us/sharepoint/fp123606?prod=zSPz&type=zTRz&l


Error 1053 when starting the SharePoint Administration Service if you have trouble deploying a solution

Sometimes your deploying a solution package and when you check in the Central Admin the solution keeps saying it’s in deploying status or with PowerShell Get-SPSolution it says False

In this case most of the time the SharePoint Administration Service (Windows Service) Is not running on one of your servers. Check if it’s started (refresh) or to make sure just stop and start the service. Do the same for the Timer Service. If you get an old school Error 1053 message when starting the SharePoint Administration Service it’s talking about dependencies which are not there. 

The resolution for this problem is to run the SharePoint Product and Configuration Wizard on every box it’s don’t want to start.


How to color code email messages in your Outlook inbox

There are many ways to organize and categorize your email. One thing is clear and that is if you don’t make some kind of a system for yourself you will be snowballed by your own inbox.

In this post I will show you how to give some incoming emails a nice color. I also categories a lot but those I use mainly for the calendar. I have  special colors for projects, clients or super important stuff. It’s nice and colorful you shoot try it some time.

A good way of sorting is to use rules based on any condition using the rules wizard on the home tab in the move section. But what if you want something like urgent messages send from a monitoring system to stand out or the once from your boss? In that case it’s a good way to color code them.

Here’s how

Go to the view tab and in the beginning you find the current view section. Here you find a nice orb with a gear button called view settings. In the menu that pops-up we want the conditional formatting button. Here’s where the magic happens.

Just add a new rule with a nice catchy name and now we need to tell it what to do so we set the conditions. This part is similar to the rules wizard. Under the Advanced tab >> Fields button you find the all mail fields section. Here’s for instance the subject line you can use for server messages which often have the same subject.

Hope it helps you out and have fun color coding.


Multiple SSL sites bind to IIS using a named certificate

Sometimes you like to have multiple sites run with an SSL certificate to be accessed under port 443. If you use a wildcard certificate (*.domain.com) as I can recall there will be no problems. But if you use named certificates weird things are happening.

You bind the wright certificate to a site and up to the next one and so on. Then suddenly an error “the certificate is in use“? You start checking the bindings and everything is mixed up.

After a search on Bing I discovered it happens on IIS 6.0, 7.0 and 7.5 and probably also on 8.0 in server 2012 but I have not checked that. The solution below works for 7.0 and 7.5.


Steps

  1. First set the certificate in IIS and then bind it using the command described below.
  2. Go to  C:\Windows\system32\inetsrv in a command prompt and fill out the command below.


Example for a site with a named certificate intranet.domain.com:
Keep an eye out for the double and single quotes!

appcmd set site /site.name:”SITE NAME AS SHOWN IN IIS” /bindings.[protocol=’https’,bindinginformation=’*:443:’].bindinginformation:*:443:name.domain.com


appcmd set site /site.name:”intranet – 443” /bindings.[protocol=’https’,bindinginformation=’*:443:’].bindinginformation:*:443:intranet.domain.com


Hope it can help you,


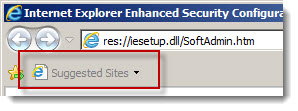
How to get rid off the “Suggested Sites” button from the IE Favorite Bar

Some people hate it and some love it. I use the Favorite Bar in IE a lot and enable it by default on my browser. Just right-click an empty area near the address bar in IE and tick the Favorite Bar.

Only their will be a moment you have to many shortcuts on your bar and than you get an anoying little pulldown arrow on the rightside of the bar. If that’s the case just use favorites what they are for initially.

So I always keep the ammount till the little arrow appears and stop. But just to make some room I delete the default Suggested Sites thingy as I never ever ever used it. And now the anoying thing the little bugger always returns and pushes my über favorites from my Favorite Bar. I think it’s a conspericy with the little arrow.

Unfortunately we cannot delete it but we can disable it 🙂 anyways I just don’t want him to come back.

Here’s how to do it,

  1. Open a Run command Windows flag +R and type gpedit.msc
  2. Go to User Configuration >> Administrative templates >> Windows Components >> Internet Explorer
  3. Look for the “Turn on Suggested Sites” policy, double click and you see it never been configured. Just choos disable and your set to go.

Now it should not return anymore.


Failover Cluster Service – Error status 87

A moment a go I was setting up a Windows Failover Cluster for SQL 2008 R2. After configuring both the NIC’s and connecting the LUNS by using SnapDrive from NetApp I thought I was ready to go.

I’ve created the cluster and all the resource groups and ready to go for the final cluster validation. I hoped the best but I already noticed the little red dot on the clusternaam right under the Failover Cluster Manager.

I was presented with a status 87 error meaning he could not retreive all the disk. It turned out that the C:\ drive has a small partition of 100 MB needed for setup and upgrade. This partition doesn’t have a drive letter assigned for good reasons only the cluster manager thought differently.

Here’s how to assign a temporarily driver letter. Because after a reboot it’s gone again but it’s only needed to validate the cluster.

Steps

  1. Open the command prompt CMD.exe
  2. Type diskpart
  3. Type list volume
  4. Type select volume 4 (or 1, 2, 3….)
  5. Type assign

Repeat this step for all the nodes in the cluster.